A swap is the simplest thing you can do in DeFi — and also the easiest place to lose money to a fat-fingered slippage setting or a fake website. This guide makes the ProjectX swap flow foolproof, in the literal sense: by the end you should not be able to make the common mistakes.
Before you swap: the 30-second pre-flight
Most disasters happen before the trade, not during it. Run this checklist every time:
- You arrived at the app via your own bookmark of the official domain — not a search ad or a Telegram link.
- Your wallet is on the correct network (HyperEVM) and holds a little of the native gas token.
- You hold the token you intend to sell, and you have double-checked the contract of the token you intend to buy.
- You understand that on a DEX, the trade is irreversible once signed.
Step by step: your first ProjectX swap
- 1
Connect your wallet
Click “Connect” and choose your wallet (MetaMask, Rabby, or a WalletConnect option). Approve the connection request. This does not give the site access to your funds — it just lets it read your address and propose transactions you must sign.
- 2
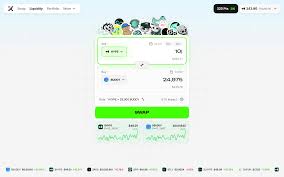
Pick the “Sell” token and amount
In the top box, select what you’re paying with and type the amount. The app shows your balance; the “Max” button is handy but leave a little native token for gas.
- 3
Pick the “Buy” token
In the lower box, select what you want to receive. The app instantly quotes the rate and how much you’ll get. If the token isn’t listed, paste its verified contract address — and be extra cautious with anything obscure.
- 4
Read the rate, price impact and slippage
Check the exchange rate and especially the price impact. A few basis points is normal; a large percentage means low liquidity and a bad fill. Set slippage tolerance sensibly (see below).
- 5
Review and confirm
Hit “Swap”, then review the transaction in your wallet pop-up: the tokens, the amounts and the network fee. Only then sign. The first time you trade a token you may need a one-time “approve” transaction before the swap itself.
- 6
Verify on the explorer
When it confirms, the new balance appears in your wallet. You can click through to the block explorer to see the on-chain receipt. Congratulations — that’s a self-custody swap.
Slippage and price impact, explained like you’re busy
Price impact is how much your own trade moves the price because you’re eating into a finite pool. Small trade in a deep pool = tiny impact. Big trade in a shallow pool = you move the market against yourself.
Slippage tolerance is the maximum price change you’ll accept between hitting “Swap” and the transaction landing. Set it too low and volatile trades fail (wasting gas); set it too high and you expose yourself to sandwich bots. For liquid pairs, a fraction of a percent is fine. For volatile, thin tokens you may need more — but if you need a lot, that’s the market telling you the trade is risky.
Foolproof rule: if price impact is high and you don’t fully understand why, stop. Break the trade into smaller pieces, or don’t trade that token at all. A “great rate” that requires 15% slippage is usually a trap.
Fees: what you actually pay
| Cost | What it is | Who gets it |
|---|---|---|
| Pool fee | A small percentage of the trade (e.g. 0.3%) baked into the rate. | Liquidity providers in that pool |
| Network gas | The fee to execute your transaction on HyperEVM. Usually low. | The network / validators |
| Approval gas | A one-time fee the first time you let the contract spend a given token. | The network |
Because ProjectX lives on HyperEVM rather than Ethereum mainnet, gas is typically a rounding error compared with the eye-watering fees you may remember from ERC-20 swaps in busy periods. Still, always keep a small buffer of the native gas token or your transactions simply won’t send.
Common swap mistakes (and how to dodge them)
Wrong website
Phishing clones rank in ads and search. Bookmark prjxn.com and never connect a wallet to a link someone sent you.
Wrong token
Scammers list fake tokens with real names. Match the contract address against an official source before buying anything obscure.
No gas left
Using “Max” on your native token leaves nothing to pay fees. Always keep a small buffer.
Sandwich attacks
Sky-high slippage invites bots to front-run you. Keep tolerance tight and split large trades.